Orax SDI Cloud Reference
- Introduction
- Self-Management tools
- Communication and Content management
- Sales and Customer Engagement
- Service Desk
- Project Management
- Automation & Wide-Area-Monitoring
- Job Cards
- Education & B-2-B online training
- Billing and customer statements
- Inventory & Asset management
- Production management
- Human Resources and Payroll
- Procurement and Supply chain
- Ledgers & Accounting
- Reporting and Analytics
- Administration & configuration
Resources and Costs
NOTE: Remember to set each project to be either a "Time and Material" or "Fixed Cost" project. These settings are important when an Account Manager draws a comprehensive Billing Report from the Customer account. This setting will affect the time sheets for the Billing Report (eg. Time sheets are not included for Fixed Cost projects).
Step 1 when creating your project plan is to create a set of tasks in the plan. Step 2 is to assign resources and costs to each task in the plan. This will allow you to cost the project as well as keep track of progress and costs.
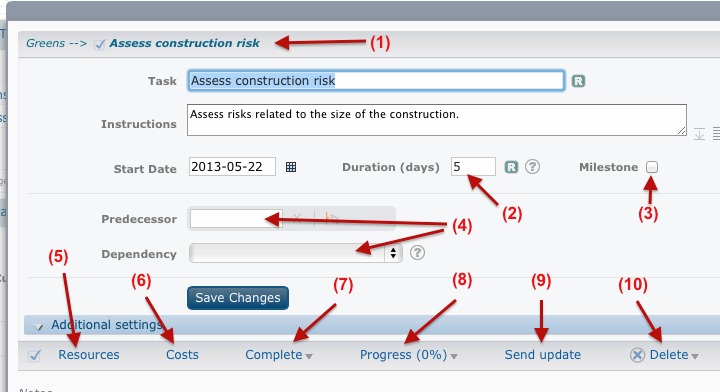
When you click on a task in your project plan, you'll see something like the above screenshot. Lets look at the options on this project plan task (follow the numbers).
1. Each task hangs somewhere in the plan hierarchy. You can change this location by either drag-and-dropping the task on another task, or by manually changing the "Parent" of the task.
2. The duration of a project task is configured in days. It cannot be configured in anything less that 1 day. The reason for this is to refrain for micro management of tasks, where the scheduled time is too short (causing micro changes in the project schedule.. For instance, a task can be a list of many small instructions and may have small amounts of "billing time" assigned to it (eg. 1 hour), but the actual project plan duration cannot be less than one day. This may be confusion if you're used to other Project Management software, but you will quickly learn to think this way and start to see the benefits of batching small tasks into one task and assigning small amounts of "billing time" rather than small amounts of "schedule time". It allows you to still account for all the items of time and cost to be accounted for, but having a less complex project plan.
3. If you flag a Task as a Milestone, it will be indicated as such in the Project Plan, and also send a notification once the Actual Task linked to this milestone is completed.
4. Correctly configuring Predecessors and their dependancies is almost unavoidable in large projects as it can become a daunting task to manually adjust the start time of many tasks. If a predecessor and dependancy is set, the system will automatically adjust tasks in relation to their dependants. A dependency is indicated on the project plan with an orange arrow.
5. Manage resources for project tasks using the Resource link (indicated above or with the shortcut on the project plan (shown below). Many resources per task are possible.

6. Manage costs (top down) for this task using the Cost link. Also see the screenshot above where you can manage costs directly from the project plan (rather than to first click the task). To link bottom up costs, use the Accounting module.
7. Complete a task (set it manually to complete) if it is not linked to an Actual Task. Project tasks linked to actual Orax SDI tasks will automatically be completed once the last linked actual task is complete.
8. You can manually configure the progress of an individual task if its a long running task. This will be overwritten by the system if there are more than one actual task linked to this project task.
9. To send an update for this task alone (to all subscribers), use the "Send update" link.
10. To delete a project task, including its resources and costs.