Orax SDI Cloud Reference
- Introduction
- Self-Management tools
- Communication and Content management
- Sales and Customer Engagement
- Service Desk
- Project Management
- Automation & Wide-Area-Monitoring
- Job Cards
- Education & B-2-B online training
- Billing and customer statements
- Inventory & Asset management
- Production management
- Human Resources and Payroll
- Procurement and Supply chain
- Ledgers & Accounting
- Reporting and Analytics
- Administration & configuration
Project Administration
A basic project in SDI consists of a project plan (the plan) and actual Tasks (created from the plan). Each project also has a project manager, billing type, status, progress and risk state - and is linked to a customer account. Just like Tasks and Service Calls, you can subscribe people and teams to a project and collaborate using comments and notes (on the plan). You can link documents to the project.
Once your project is created, it is time to import or create your plan. Use the relevant links on the "Project plan" tab to create tasks or "Import" tasks from an MS Project export to XLS (using the correct template) - follow the onscreen guide.
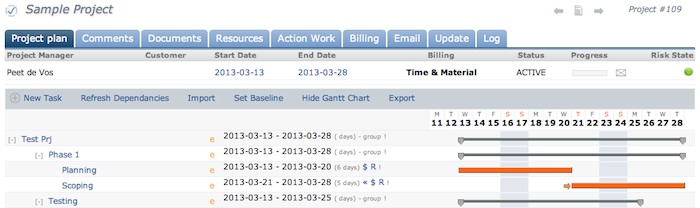
The project plan can be managed following the below guideline. Most items can be clicked to edit the specific task, resource or cost. Drag-and-drop tasks to sort them. Indent tasks to create groups.
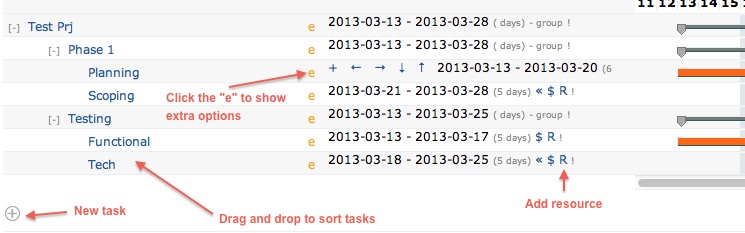
To add tasks beneath a specific other task, click the "e" next to the task and then the "+" to create a task just below the current one.

Once your project plan is ready, base-line it by click the "Set Baseline" option. This will create a marker to help track delays and progress (compared to the original plan).
When you are ready to action your project, go to the "Actual Work" tab and click "Action work from Project Plan". This will create SDI Tasks for all the linked Resources, and deliver them to their "Items to Resolve" list on their home page at the required time.

If your project plan changes and you have actioned "Actual tasks", they will become out of sync. You can re-align the "Actual Tasks" to the new project plan by using the above "Adjust work to align…" link.
One of the key benefits of using Orax SDI Projects is that once the "Plan" is complete, the system can action each task automatically without the Project Manager having to manually do this. The project manager will be kept in the loop, but not required to do everything him/her self.